
How to Install a MrCool DIY Mini Split in 4 Hours
A step-by-step walkthrough of a complete MrCool DIY 5th Gen mini split installation — from unboxing to cold air — in under four hours with no HVAC license required.
Admin User
Author
Why the MrCool DIY Mini Split Is a Game-Changer
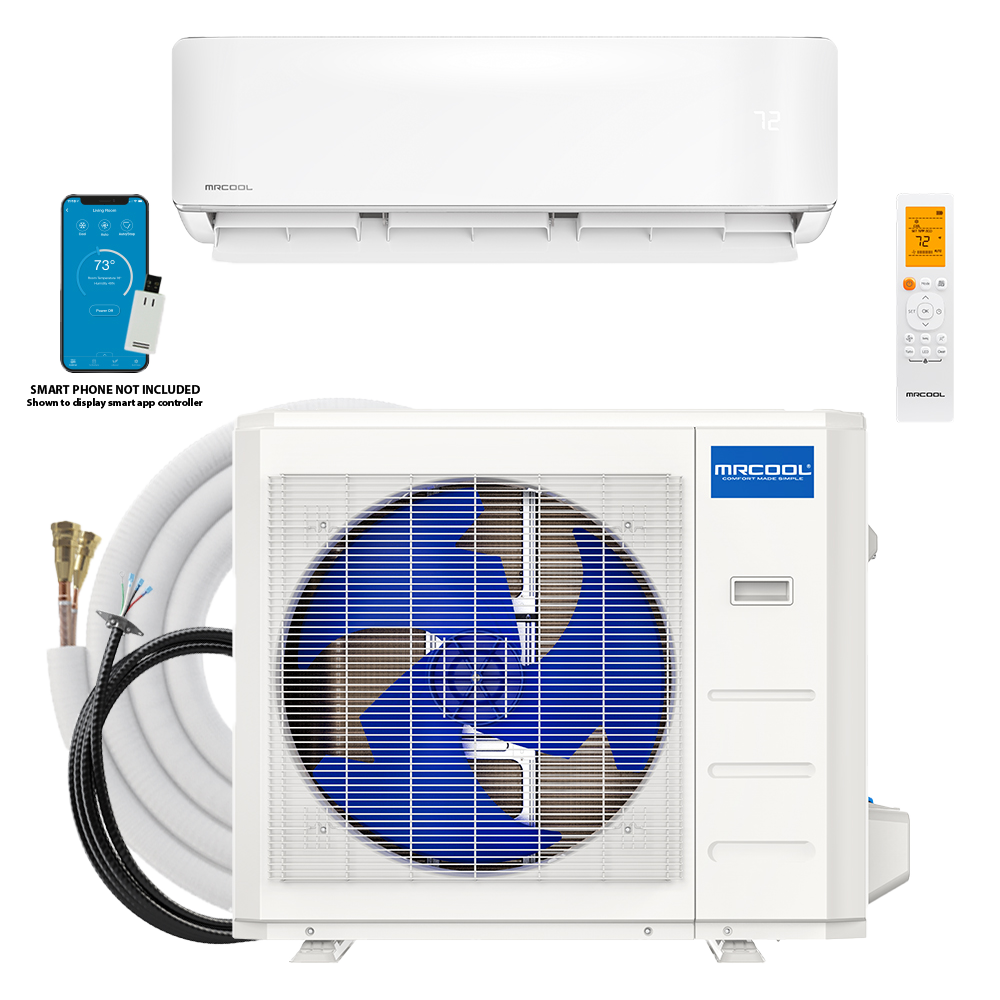
If you've ever priced out a professional HVAC installation, you know the numbers can be brutal — $3,000 to $7,000 for a single-zone system once labor is factored in. The MrCool DIY line flips that script entirely. With pre-charged Quick Connect line sets, you can install a full heating-and-cooling system in a single afternoon without calling a technician, pulling permits for refrigerant handling, or owning any specialized gauges.
I'm not exaggerating when I say four hours. That's wall-to-wall — unboxing, mounting, running the line set, wiring, and startup. If you're handy enough to hang a shelf and drill a hole through a wall, you can do this. Zomg the Handyman has installed dozens of these units and consistently finishes in the three-to-four-hour window.
Tools You'll Need
Before you start, gather everything so you don't lose momentum mid-install:
- Drill/driver with a set of bits (including a 3-inch hole saw)
- Level (a torpedo level works fine)
- Stud finder
- Adjustable wrench set
- Wire stripper / wire nuts
- Electrical tape and zip ties
- Caulk or putty (for sealing the wall penetration)
- Step ladder (for indoor unit mounting)
- Concrete anchors or lag bolts (depending on your outdoor surface)
Everything else you need — the mounting bracket, hardware, and Quick Connect line set — ships in the box with the MrCool DIY 5th Gen 12K BTU Bundle and every other bundle size.
Step 1: Choose Your Location (30 Minutes)
Indoor Unit Placement
The wall-mounted air handler needs to sit high on an interior wall — ideally 6-8 inches below the ceiling. You want:
- Unobstructed airflow: nothing within 6 inches on either side.
- Proximity to an exterior wall: the line set runs through the wall to the outdoor unit, so shorter is better.
- Stud access: the mounting plate screws into at least one stud.
Outdoor Unit Placement
The condenser should sit on a flat, stable surface — a concrete pad or wall-mounted bracket. Keep these rules in mind:
- At least 12 inches of clearance on the sides and 24 inches in front of the unit for airflow.
- Avoid locations where snow drifts pile up or where downspouts dump water.
- The closer to the indoor unit, the less line set you need to manage.
Step 2: Mount the Indoor Bracket and Drill the Wall Hole (45 Minutes)
Use the included mounting plate as a template. Hold it against the wall, level it, and mark your screw holes. Drive screws into at least one stud; use drywall anchors for the remaining holes if needed.
Next, drill the 3-inch hole through the wall at a slight downward angle toward the outside. This angle is critical — it lets condensate drain outward instead of pooling inside. If you're going through brick or concrete, a hammer drill with a masonry bit is your friend.
Pro Tip from Zomg
Zomg the Handyman recommends drilling from the inside out so you can control the position precisely, then cleaning up the exterior hole afterward.
Step 3: Run the Line Set and Wiring (60 Minutes)
This is where the MrCool DIY system really shines. The Quick Connect line set uses pre-flared, pre-charged connections that literally click into place. No vacuum pump, no manifold gauges, no torque wrench calibration.
- Feed the line set, drain hose, and communication wire through the wall hole from the inside out.
- Connect the line set to the indoor unit — the fittings are clearly labeled. Hand-tighten, then snug with a wrench. You'll hear/feel the click when the connection seats.
- Route everything along the wall to the outdoor unit. Use the included wall clips or zip ties to keep things tidy.
- Connect the line set to the outdoor unit the same way — click, snug, done.
- Wire the communication cable per the wiring diagram in the manual (it's straightforward: match colors to terminals).
Electrical
The 12K BTU and 9K BTU units run on a standard 115V/20A dedicated circuit. The 18K, 24K, and 36K BTU units require 230V/30A. You'll need a disconnect box near the outdoor unit — this is code in most jurisdictions. If you're not comfortable running a new circuit, this is the one part where hiring an electrician for an hour makes sense.
Step 4: Seal, Vacuum-Free Purge, and Start Up (45 Minutes)
Seal the wall hole with putty or caulk — inside and out. Don't skip this; air leaks destroy your efficiency gains.
Open the service valves on the outdoor unit to release the factory refrigerant charge into the line set. The MrCool DIY system ships pre-charged with R-410A (5th Gen) so there's no need to vacuum the lines. The small amount of air in the short line set gets purged during this process.
Power on the unit, grab the remote (or connect via the SmartHVAC app), and set it to cool mode. Within a few minutes you should feel cold air blowing. Congratulations — you just installed a mini split.
Step 5: Final Checks (15 Minutes)
- Verify the indoor unit is draining properly (watch for drips at the outdoor end of the drain hose).
- Check that all connections are snug and no refrigerant is hissing.
- Test both heating and cooling modes.
- Download the MrCool SmartHVAC app and connect via WiFi — built-in on all 5th Gen units.
What Size Do You Need?
Quick rule of thumb:
| Room Size | BTU | Best Bundle |
|---|---|---|
| Up to 250 sq ft | 9,000 | 9K Bundle |
| 250-450 sq ft | 12,000 | 12K Bundle |
| 450-750 sq ft | 18,000 | 18K Bundle |
| 750-1,100 sq ft | 24,000 | 24K Bundle |
| 1,100-1,500 sq ft | 36,000 | 36K Bundle |
Check out our detailed BTU sizing guide if you want to factor in ceiling height, insulation quality, and climate zone.
Common Mistakes to Avoid
- Not using a dedicated circuit. Sharing a circuit with other appliances will trip breakers and void your warranty.
- Skipping the wall seal. A quarter-inch gap around your line set is like leaving a window cracked year-round.
- Mounting the outdoor unit on dirt. Use a concrete pad or mounting brackets. Units sitting on bare ground collect moisture and debris.
- Ignoring the downward wall angle. If your hole angles upward, condensate backs up into the wall. Bad news.
- Over-tightening line set connections. Snug is enough — you'll feel the click. Gorilla-gripping the fitting can crack the flare.
Ready to Get Started?
Every MrCool DIY 5th Gen Bundle ships with everything you need — indoor unit, outdoor unit, pre-charged Quick Connect line set, mounting hardware, remote, and a clear installation manual. Use promo code SUMMER100 at checkout to save $100 on your order.
Four hours from now, you could be sitting in a perfectly climate-controlled room that you installed yourself. That's a pretty good Saturday.
Share this article
Get a system built for your exact install
Our configurator picks the right line-set lengths and accessories for your run, so nothing is missing on install day.
More on this topic: DIY Installation
Keep Reading
Related Articles
MrCool DIY 5th Gen vs 4th Gen: What Changed
A detailed comparison of MrCool's DIY 5th Generation and 4th Generation mini splits — what improved, what stayed the same, and whether it's worth upgrading.
First-Time Mini Split Install? Everything You Need to Know
Never installed HVAC before? This beginner-friendly guide covers everything from picking the right system to flipping the switch on your first MrCool mini split.
How Zomg the Handyman Installs MrCool Mini Splits
Pro tips and techniques from Zomg the Handyman — the approach, the tools, and the workflow that make every MrCool DIY install smooth and professional-looking.