
MrCool Quick Connect Line Set Guide
Everything you need to know about MrCool's Quick Connect line sets — how they work, available lengths, installation technique, and troubleshooting common issues.
Admin User
Author
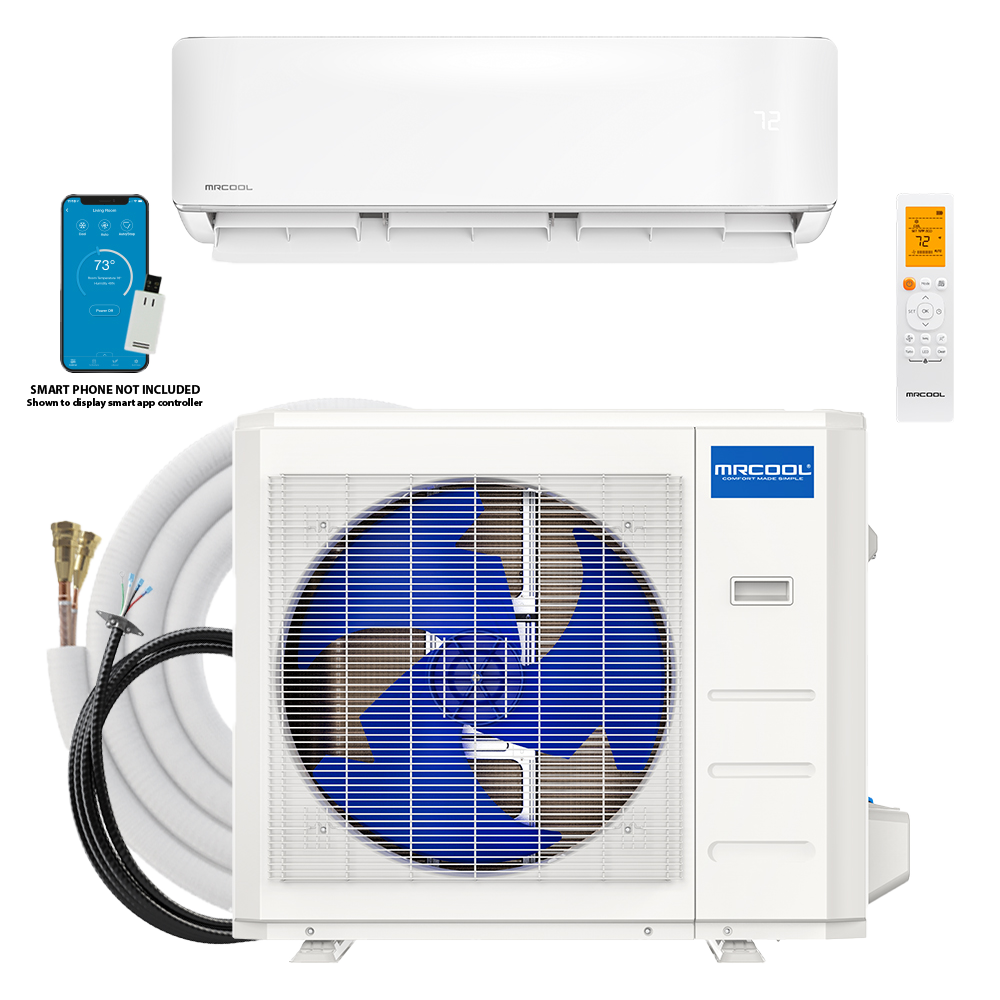
What Makes Quick Connect Different
Traditional mini split line sets require professional installation. An HVAC technician has to flare the copper tubing on-site, connect the fittings with a torque wrench to exact specifications, vacuum the lines to remove air and moisture, and then charge the system with refrigerant using manifold gauges. Each of these steps requires specialized tools and training.
MrCool's Quick Connect system eliminates all of it.
The line set ships pre-flared, pre-insulated, and the outdoor unit ships pre-charged with the correct amount of R-410A refrigerant. The connections are designed to seat with hand-tightening plus a quarter-turn with a standard wrench. No vacuum pump. No gauges. No certification.
This is the single biggest innovation that makes the MrCool DIY line genuinely do-it-yourself, and understanding how it works will make your installation smoother and your system more reliable.
How It Works: The Engineering
Pre-Charged Connections
Inside the outdoor condenser, the compressor, condenser coil, and expansion valve come factory-charged with R-410A refrigerant. The service valves are closed, keeping the refrigerant sealed inside the outdoor unit during shipping.
When you open the service valves during installation, the refrigerant flows through the line set to the indoor unit's evaporator coil, completing the circuit.
The Connection Mechanism
Each end of the line set has a flared fitting that mates with a corresponding port on the indoor and outdoor units. The flare is precision-formed at the factory — no on-site flaring means no risk of an imperfect flare causing a leak.
The connection process:
- Remove the protective caps from the line set fittings and the unit ports.
- Align the fitting with the port.
- Thread the nut onto the port by hand until snug.
- Use a wrench to tighten approximately one quarter turn past hand-tight.
- You'll feel a subtle click or resistance change when the fitting seats correctly.
That's it. Both connections — indoor and outdoor — work the same way.
What About Air in the Lines?
In a traditional installation, vacuuming the lines is critical because any air or moisture in the system degrades performance and can damage the compressor over time. MrCool's system handles this by keeping the line set sealed until installation and using the initial refrigerant release to purge the small volume of air in the line set through a purge port.
Is this as thorough as a full vacuum? Technically, no. In practice, the amount of air in a 16-25 foot sealed line set is negligible, and MrCool accounts for it in their charge calculations. Millions of units have been installed this way with no issues.
Available Lengths
MrCool Quick Connect line sets come in several standard lengths:
| Length | Best For |
|---|---|
| 16 feet | Indoor and outdoor units on the same wall or adjacent walls |
| 25 feet | Standard installation with outdoor unit around a corner or below the indoor unit |
| 50 feet | Long runs — outdoor unit in a yard, on a roof, or far from the indoor location |
The MrCool DIY 5th Gen 12K Bundle ships with a 25-foot line set, which covers the vast majority of residential installations. If you need a different length, replacement line sets are available separately.
Can You Cut a Line Set Shorter?
No. Do not cut, modify, or extend a Quick Connect line set. The refrigerant charge in the outdoor unit is calibrated for the specific line set length. Cutting the line set would also break the factory seal and require professional re-flaring and charging — defeating the entire purpose of the DIY system.
If your installation path is shorter than the line set, coil the excess neatly behind the outdoor unit or in the line set cover channel. Avoid kinking — gentle curves only.
Installation Best Practices
Before You Connect
- Inspect the flare fittings. Look for any damage from shipping — dents, scratches on the sealing surface, or bent threads. If anything looks off, contact HVACZAR support before proceeding.
- Keep caps on until ready. The protective caps prevent dirt, moisture, and debris from getting into the fittings. Don't remove them until you're about to make the connection.
- Straighten the line set gently. It ships coiled. Uncoil it carefully without kinking the copper tubing.
Making the Connection
Zomg the Handyman has a specific technique for the Quick Connect fittings:
- Clean the flare face with a lint-free cloth. Even a tiny particle can prevent a perfect seal.
- Apply a thin film of refrigerant oil (nylog or equivalent) to the flare face. This isn't strictly required, but it helps the flare seat smoothly and provides an extra layer of sealing.
- Thread by hand first. Always. If the nut doesn't thread smoothly by hand, something is misaligned. Forcing it with a wrench will cross-thread the fitting.
- Wrench-tighten one quarter turn past hand-tight. Use a backup wrench on the port to prevent the unit's connection from rotating while you tighten the nut.
- Check for leaks after opening the service valves. Apply soapy water to each connection and watch for bubbles. No bubbles = good seal.
After Connection
- Route the line set with gentle bends. Minimum bend radius is about 4 inches for the 1/4" line and 6 inches for the 3/8" line. Sharp kinks restrict refrigerant flow and reduce efficiency.
- Support the line set every 3-4 feet along horizontal runs using clips, hangers, or zip ties. Unsupported line sets sag over time, creating low spots where oil can pool.
- Insulate any exposed sections. The line set comes pre-insulated, but if you need to route around obstacles, make sure the insulation isn't compressed or torn.
Troubleshooting
The nut won't thread smoothly
- Misalignment. Remove, realign, and try again. Never force it.
- Cross-threading. If the threads feel rough or resistant, stop. Inspect both the nut and the port threads for damage.
Bubbles at the connection after opening service valves
- Tighten the nut an additional 1/8 turn and recheck.
- If bubbles persist, close the service valves, disconnect, inspect the flare face for damage, clean, reapply oil, reconnect, and re-tighten.
- If the flare is visibly damaged, you need a replacement line set.
The line set is too short
- You cannot extend Quick Connect line sets. You'll need to reposition one of the units or purchase a longer line set.
Excess line set length
- Coil the extra length in a neat horizontal loop behind the outdoor condenser. Avoid coiling in a vertical spiral — it can trap refrigerant oil.
Why This Matters for Your Installation
The Quick Connect line set is the single component that makes the difference between a $300 DIY install and a $2,000+ professional job. Understanding how it works — and treating the connections with care — ensures your system performs at its rated efficiency for years.
Every MrCool DIY 5th Gen Bundle includes a properly sized Quick Connect line set. The 9K, 12K, 18K, 24K, and 36K units are all designed around this system.
Use code SUMMER100 at checkout to save $100 on your bundle.
Share this article
Get a system built for your exact install
Our configurator picks the right line-set lengths and accessories for your run, so nothing is missing on install day.
More on this topic: DIY Installation
Keep Reading
Related Articles
How to Install a MrCool DIY Mini Split in 4 Hours
A step-by-step walkthrough of a complete MrCool DIY 5th Gen mini split installation — from unboxing to cold air — in under four hours with no HVAC license required.
MrCool DIY 5th Gen vs 4th Gen: What Changed
A detailed comparison of MrCool's DIY 5th Generation and 4th Generation mini splits — what improved, what stayed the same, and whether it's worth upgrading.
First-Time Mini Split Install? Everything You Need to Know
Never installed HVAC before? This beginner-friendly guide covers everything from picking the right system to flipping the switch on your first MrCool mini split.